Monday, 6 December 2010
Tuesday, 1 June 2010
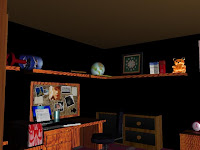
Lights

For some funny reason the wallpaper don't show after rendering so the room looks kind of dark. I had to place the light in th centre of the room in order to lit the entire room, for some funny reasons I cannot explain my teddy bear is shining even though the texture is a lambert file.
More pictures- Different angle view
The globe scene problems
-When the ball hits the wall, it would have looked better if it rocked a little bit before coming to an abrupt stop like in my video.
-Also when the globe ball is in the air an when it rolls on the shelf, you can see that the rolling on the shelf is way too fast compared to when the all hits the floor,it doesn't look like it's a contination of the same action.
-Also when the globe ball is in the air an when it rolls on the shelf, you can see that the rolling on the shelf is way too fast compared to when the all hits the floor,it doesn't look like it's a contination of the same action.
The same scene (3 angles view)
VASE-BOOKS-STATUE-AWARD-RADIO-SOUL SCALE-TRAIN
Train-lamp-globe-frames-small transparent ball
Small ball to clock
Anticipation
I did try to apply some anticipation to my bouncing globe ball when it's hit by the lamp, I slowed it down a bit in the air just very slightly before it hits the wall shelf. (I probably should have added a few frames before it hits the floor in order for it to look like it really looks like it's hanging in the air for some time- more anticipation effect like).
Problems I encoutered
-While setting the camera to animate the scene, I tried to save the keyframes each time I moved the aim, the thing is I forgot to move the body along with the aim and save it. So the camera kept on jerking everytime and I couldn't understand why.
Jerking camera test
Jerking camera test
-I had a problem with understanding how to use the difference tool. I tried to make a hole in a rectangle to create a box but it always ended creating a smaller rectangle. Then I realize that I had to select the biggest shape then the smallest one in order to make a hole the shape of the smaller selected shape in the biggest selected shape.
-Making the globe roll was another issue, it simply wouldn't roll properly because I rotated the object myself every 10 frames but I did not rotate it the right way, so the whole rotation looked funny. Then I remember what we were told about maya creating the frames in-between, so I decided to save a keyframe where the globe hasnt started rotating on the shelf yet, then I moved the globe to the bottom and rotated all the way round until the image of globe reached the same point as the one on the first keyframe...and it worked it rotated properly maybe too fast because there weren't many keyframes but it looked smooth.
-Textures: I had a problem with placing textures on my shapes, they stretched all over the place, so I hadto learn how to use plannar mapping in order to place the texture exactely where I wanted it to be (I also found that, I could select a face and apply a texture to it instead of the whole object, which I did to my train)
-I did not use the graph to create curves for my bouncing ball but I intend to do so the next time
Friday, 28 May 2010
Camera angles
Camera Videoing Angles
These are camera angles that I have picked to use in my animation (Just screenshots)


Screenshots (Maya Modelling)
These are screenshots of object I modelled in maya (Everything else in on the CD)
Hint: Just relized that nurbs were really good for curves and polygon better for other shapes.
Modelling a train MAYA
 Modelling a vase in maya
 Modelling a wooden statue

Thursday, 27 May 2010
Extrude, difference, union (Planning Modelling)
Before modelling the objects I had to choose which way was the best to create each object for my scene in maya. So here my plans, it shows how i broke down the objects into different shapes and how I thought about which technique to use to combine them and turn them into objects.


List of websites tutorials I used
I used VTC for http://www.vtc.com/ Maya Basics and Alias Wavefront/ Maya unlimited 2.o Website http://caad.arch.ethz.ch/info/maya/manual/MasterIndex.html for the rest.
Some tests of my own
Some reference tests (Chain reaction) that I made myself to help me out with the animation.
(I had to replace the train with a small car and the lamp with a deorodant stick because the lamp is too big for the car and in my animation the train is heavier than the lamp).
Just trying to see how I could make my books and DVDs fall in the video
(I had to replace the train with a small car and the lamp with a deorodant stick because the lamp is too big for the car and in my animation the train is heavier than the lamp).
Just trying to see how I could make my books and DVDs fall in the video
Animatic
Just an animatic showing how I picture the animation (There are three angles, this is camera angle 1).
Domino Effect- Reference videos
Here are some references on different types of domino effects or chain reactions.
Building shapes in Illustrator
Illustrator is a bit like a 2D CGI shape designer, to design shapes you have to break the object apart, and that's why I used illustrator to design the objects before modelling them in maya.
.jpg)
.jpg)
Some objects with different views
.jpg)
.jpg)
See Illustrator shapes on CD for more objects with different views#
The video below shows how I broke apart and designed some of the objects using illustrator.
Here are the shapes that have been designed to be modelled later on in maya
Some objects with different views
See Illustrator shapes on CD for more objects with different views#
Illustrator- Sequence of events
I used illustrator here to create shapes using the different shape and pen tools, and to design a sequence that shows how I picture my domino effect animation (It shows the objects that are going to be animated and their motion).
The video that shows I designed my sequence of events
Here is the image that shows the sequence of events (The final piece)
 (It has also been sved into an AI file- See CD)
Print or Web ?
This is part of one of the tasks we were given, save a file for printing or web in the right file format. So here is a screenshot of how I saved each file according to its use and the settings.
WEB- Coulb be saved as a JPEG, GIF or PNG
.jpg)
Colour mode: RGB Resolution: 72 DPI File Format: Either JPEG, GIF or PNG
PRINTING-Could be saved as TIFF or EPS
.jpg) Colour mode: CMYK Resolution: 300DPI FILE FORMAT: EPS or TIFF
Colour mode: CMYK Resolution: 300DPI FILE FORMAT: EPS or TIFFObjects references (From my Bedroom)
I had a look at real objects from real life just to be able to draw in 3 dimensial view, from different angles (Front, back, bottom, top, left, right and perspective), I used them as a reference.
+1.jpg)

.jpg) And some objects references found on the internet (Objects that I couldn't find or didn't have).
And some objects references found on the internet (Objects that I couldn't find or didn't have).
+real.jpg)
How I came up with my montage
This is a montage that shows how I picture my bedroom scene (it shows four different angles views, Left, right, front and back of the room)- I have decided to place the animated objects on the wall shelfs only). - (See illustrator sequence event).
+real.jpg)
To select the different objects I just had to combine the select marquee tool, ellipse tool, magic want, quick mask mode, magnetic and polygonal tool.
MONTAGE PART 2 - Selection tools with FLIP, RE-SCALE and Rotate
+real.jpg)
Bedroom References
For my bedroom design, I wanted to go for a teenager bedroom style (Girly style), so I looked at some different girls bedroom designs. (Just to have an idea of what it looks like and what objects could be found in it).


My Final Floor Plan
For my CGI animation I have decided to animate a domino effect taking place in a bedroom instead of a kitchen (I already have a floor plan, I just need to think about what objects I want to add to the scene). I need to come up with a list of objects I might include in the bedroom scene.

.jpg)
Monday, 3 May 2010


Friday, 30 April 2010
Floor Plan- Sample 2
I still haven't found a kitchen floor plan to refer to...so I guess I will have to design my own without any kitchen plan reference (I will try to use the other floor plans)

Blue prints-Floor plan
While still thinking about other objects I could include in my kitchen, I have decided to look a t different blue prints/Floor plans. 
Domino effect- Kitchen Theme
For my domino effect project I have decided to pick kitchen as my theme. My first task is to make a list of objects that could be found in a kitchen. (then I will look at some references>images).
-Microwave -Plates -Milk
-Sink -Glasses -Sugar
-Fridge -Knives,forks,spoons -Salt
-Freezer -Coffee machine -Food (Eggs...)
-Mugs -Pots
-Frying pans -Bowls
-Washing machine -Cereals
-Dish washer -Fruits

-Microwave -Plates -Milk
-Sink -Glasses -Sugar
-Fridge -Knives,forks,spoons -Salt
-Freezer -Coffee machine -Food (Eggs...)
-Mugs -Pots
-Frying pans -Bowls
-Washing machine -Cereals
-Dish washer -Fruits
Thursday, 29 April 2010


1st Mini task achieved- =)
THE END =)
I had to save this image in TIFF format (For printing) with a resolution of 300 DPI(Enhance the colour and the pixels, good for glossy paper) and in JPEG format (For web upload) with a resolution of 72 DPI (Easier and faster to upload and/or download).I also had to change the color mode for the Tiff file to CMYK, better for a printing process.
The wooden table.
PERSONAL PHOTOSHOP EXPERIMENTATION
Finally the montage background, the original image was way too light and had a logo on it on the bottom right side.
Here is the original image

So I basically had to crop the image and darken it by messing with the adjusments (Contrast, saturation, light...etc)
Finally the montage background, the original image was way too light and had a logo on it on the bottom right side.
Here is the original image

So I basically had to crop the image and darken it by messing with the adjusments (Contrast, saturation, light...etc)
Croissants and Forks
 For the two croissants I simply used the magnetic tool since teh edgs are roun and soft enough, and the background is light and plain, it doesn't get mixed with the croissant.
 ♥ For the second croissant, the one under the croissant on top, I simply rotated it and added a distort effect to it to make it look somehow flatter (To make it look like it's really on the plate).
FORKS
 To select the knife I first used the magnetic tool, then after pasting it on the montage, I looked very closely and realized that it ad somehow selected the white edges as well, so I tried to clean the white edges using the eraser tool, it didn't come out as expected, it gave the knife edges a wobbly look.
My resort was to use the polygonal tool to selected the white and wobbly edges ando delete them.
Same procedure was foolowed for the fork. (This time around I didn't use the magnetic tool but only the polygonal lasso tool, the edges wheretoo sharp to use the magnetic tool).
Subscribe to:
Comments (Atom)